
Quick Start Guide
For The Sporecyte Air Sampling Pump
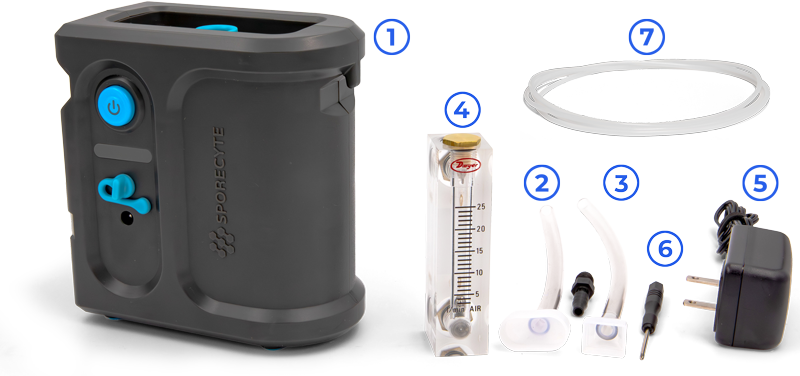
The Sporecyte Air Sampling Kit Includes
- The Sporecyte Air Sampling Pump
- Calibration adapters
- Barbed tubing adapter
- Rotameter (flow meter)
- 12v power adapter
- Phillips-head screwdriver to adjust the calibration
- Optional elastic band for additional sample security, which holds the cassette securely to the kit (although the Pump is designed to achieve the proper connection with or without this feature).
1. Pump Operation
- Press the power button to turn on the Pump.
- After powering on, press the start button to begin an automated 5-minute sample cycle.
Note:- 5 progress LEDs display how many minutes are left on the current sample.
- If you need to take a longer sample, simply press the power button again to add another 5 minutes to the sample time after the five-minute sample cycle concludes.
- The Sporecyte Pump works with both rectangular and circular air sampling cassettes.
- The cassettes that Sporecyte supports are designed to be used at a 15 liters per minute flow rate.
- Power button
- LED indicator (each of five lights darken as they count down one-minute intervals)
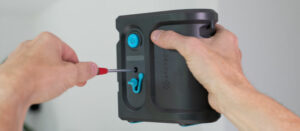
- Recessed screw for flow rate adjustment (calibration).
2. Calibrate the Pump
The Pump has field-adjustable calibration. Using the supplied calibration equipment, check and adjust the Pump flow rate in the field. The pump does not come calibrated and will need to be calibrated before it’s used.
- Place the Pump on a stable surface.
- Screw the barbed tubing adaptor to the top threaded opening on the rear of the rotameter.
- Attach the calibration connector for the desired cassette type securely to the barbed adaptor.
- Attach the cassette to the top of the Pump.
- Attach the cassette connector to the inlet nozzle of the cassette.
- Turn the Pump on and observe the flow rate measured on the rotameter.
The rotameter sold with the Pump is designed to be read at the center point of the round float and should be held level when reading the flow rate. - If the flow rate needs to be adjusted, use a screwdriver (included) to turn the flow adjustment slightly. Turn the screw clockwise to increase the flow and counterclockwise to decrease the flow.
- Once the flow rate is set to the desired level, turn off the pump and remove the calibration accessories. The Pump is now ready for sampling.
3. Optional Rechargeable Battery Pack
Optional
- A 12v battery pack may be used for a cord-free experience.
The Talentcell Rechargeable 12V battery has been tested, can process over 60 samples when charged, and will hold a charge even if it sits for a while in between uses.
Note: When using the battery pack, ensure the pump is powered by the battery pack when calibration is performed, as the flowrate may differ when using the supplied plug-in power adaptor.
4. Recommendations
Sporecyte recommends using a designated cassette, used only for calibration purposes, and checking the calibration:
- At every project location
- When switching cassette types
- When switching power sources (battery vs. power cord).